Subscribe  RSS

UseShots Editor v0.4 released

April 8th, 2008 Posted in Updates, UseShots Editor, UseShots Samples | 1 Comment » На русском

1. UseShots Editor v0.4 has been released

UseShots Editor is a little tool that makes screen shot based blogging extremely easy. Just take screen shots, annotate them and press “Publish”.

In version 0.4 you will find more screen shot related fatures.

2. Screen capture timer

Screen capture timer
This feature resembles the selt-timer in digital photo cameras.

The timer is used to capture interface elements that must be active when you take a screen shot. For example, expanded menus and tooltips.

The timer has 3 modes:

  1. Off (default) - timer is inactive. The UseShots Camera captures the screen area inside the red frame the same moment you press “Shoot”.
  2. 5s - Timer is active. The screen shots is taken 5 seconds after you press “Shoot”.
  3. 10s - Timer is active. The screen shots is taken 10 seconds after you press “Shoot”.

3. How to use the screen capture timer?

  1. Position the UseShots Camera so that the desired area of the screen is inside the red frame.
  2. Make sure the element that you want to capture (expanded menu, tooltip, etc.) is also inside the frame.
  3. Select the delay time (either 5s or 10s). Make sure this time is enough to activate the desired element.
  4. Press “Shoot”. You wil see a countdown next to the “Shoot” button.
  5. Activate the element.When the countdown is over the screen shot will be taken and inserted into the current screen of the UseShots Editor.

Hint: I can use your mouse inside the red frame of the UseShots Camera as if this area was a hole.

4. Paste Images

Paste Images
To paste any bitmap image from clipboard to UseShots Editor right-click on the image area of the editor and select Paste image. This option is only available when clipboard already contains an image.

With this feature, you can insert a screen shots:

  • of the entire desktop - Press Print Screen to place a bitmap of the desktop into clipboard.
  • of the active Window - Press ALT + Print Screen to place a bitmap of the active into clipboard.

You can use this ALT + Print Screen trick to take a screen shots of the UseShots Editor window, which hides when you take screen shots using UseShots camera.

5. Load images

You can also use the same right-click menu (Load image… menu) to load screen shots (or any other images) from files on your disk.

At this point, you can load BMP, JPG and GIF files.

6. Other new features

  • Improved quality of GIF screen shots.
  • em and strong tag added to the list of the HTML tags you can use in your UseShots atricles. Other tags are a, b, i, u, div, span.
  • User Agent - you can identify UseShots Editor in you web server logs by the “UseShots Editor <version>” user agent string. Previous versions used a generic user agent string.

7. Release notes

UseShots Editor v0.4 has been tested with WordPress 2.3 and WordPress 2.5 (Check this post about WordPress 2.5 post editor, created using UseShots Editor v0.4 and published on my WordPress 2.5 blog.)

You can download the latest version here.

Version 0.4 is compatible with previous versions 0.2.x.x and you can install it on top of the existing copy.

Here is the updated Getting Started with UseShots Editor tutorial.

Any comments and suggestions are welcome.

My favorite WordPress 2.5 improvement: the new post editor.

April 6th, 2008 Posted in UseShots Editor, UseShots Samples | 1 Comment » На русском

1. Post editor

I have been playing with WordPress 2.5 on my local computer for some time now, and I must admit I like it. What I like the most is the new post editor. Now they use TinyMCE v3.06 (v2.1.1.1 was used in WP 2.3.2) and it seems like a huge improvement.

OK, let me show you my favorite improvements.

2. Fullscreen mode

Fullscreen mode
If you write long posts, you will like the fullscreen mode of the editor. You can see all the text at once and don’t have to scroll it back and forth all the time.

3. Permalink preview

Permalink preview
Right below the post title you can see the permalink that will be assigned to your post when you publish. And if you don’t like like it, you can change it. Much clearer than the “post slug” in the previous versions.

4. Add media toolbar

Add media toolbar
To my mind, the new “Add media” toolbar is not an improvement, just a change in the user interface. It consists of four buttons to add images, videos, music, and other media files respectively. If you can’t find the file upload section, click one of these buttons.

5. Media Library

Media Library
What I can call an improvement is the new Media Library, something that was previously known as “Browse All” in the file upload section. It is not only lists all your uploaded files, but also breaks them down by type, date, and allows to search for files. Really convenient when you have many uploaded files.

6. HTML mode

Another good news for those who like to add some spice to their posts in HTML mode. Your code will be saved intact.

In previous version, the post editor had an irritating habit of modifying your html code. It would convert your div’s into old-fashioned p’s, neglecting nested div’s and breaking your formatting. Even when you don’t have the “WordPress should correct invalidly nested XHTML automatically” enabled.

This behavior had a side effect for UseShots generated posts. UseShots Editor makes use of div’s to format post. Each screen is a div. And the screen div contains nested div’s for screen shots and annotations. If you publish your articles directly from within UseShots Editor, they are saved correclty and formatting is preserved. However when you edit the published articles in the admin area of WordPress, all divs will be silently converted into p’s. As a result, the formatting of the post will not be as solid. The post will still look pretty good, but the fact that WordPress can’t preserve your formatting after modification means you can’t rely on CSS in your own posts, which is really bad.

This is no longer the case in WordPress 2.5. The editor keeps your html formatting intact. You can modify your UseShots-generated posts however you like in the WordPress post editor - the structure and your own html code will be preserved.

It’s good to see that your creativity is no longer limited by a dumb text editor.

7. Time to upgrade

I like WordPress 2.5. It is worth it to spend half an hour and upgrade your existing blog to the latest version. (If you are not sure how to do it, you can find some links to the upgrade guides here.)
P.S.When I was ready to publish this post, I found that article on WordPress.com’s official blog that proves my point about the post editor.

Matt says they paid particular attention to TinyMCE v3.0 integration and interaction with complex HTML. As a result the new post editor “doesn’t mess with your code anymore.”

And I found one more, bonus improment in that post. Concurrent editing protection is the feature that can prevent losing hours of work on setups where multiple authors can simultaneously work on the same article.

UseShots Editor 0.4 sneak peek

April 3rd, 2008 Posted in Updates, UseShots Editor | No Comments » На русском

Version 0.4 is almost ready. I just want to test it with WordPress 2.5 and rewrite the Getting Started with UseShots Editor tutorial before the official release.

New features in version 0.4 (most of them have to do with screen shots and images)

  • Timer - useful to capture expanded menus.
  • Paste images - you can paste images from clipboard right into UseShots Editor (they will be automatically resized to fit you  blog’s column width).
  • Load images - you can load images from files (right-click in the image area).
  • Improved quality of GIF screen shots.
  •  User Agent - you can identify UseShots Editor in you web server logs by the “UseShots Editor <version>” user agent string. Previous versions used a generic user agent string.

If version 0.4 is not released by the time you read this message, you can download a development version (Check the development version link at the bottom of the Download page.)

Version 0.4 is compatible with previous versions 0.2.x.x and you can install it on top of the existing copy.

Any comments and suggestions are welcome.

Update: UseShots Editor is Now Friendly to Owners of Multiple Blogs.

March 25th, 2008 Posted in Updates, UseShots Editor, UseShots Samples | 7 Comments » На русском

1. UseShots Editor v0.2.3.37

UseShots Editor is a desktop application that makes it very easy to create and publish screen shot based blog posts (i.e. tutorials, reviews, “how to” guides, bug reports, etc.) Version 0.2.3.37 is now available for downloading.

2. Site profiles

Site profiles

In this release, I added site profiles to UseShots Editor. Site profiles allow to publish your articles on multiple blogs. If you are like me and have more than one blog, you will find this feature very useful. Now you don’t have to change site settings (screen shot width, address, login details) every time you want to publish an article on another blog. Just add a profile for each of your blogs. Then choosing a target blog will be a matter of a mouse-click.

3. Editing profiles

Editing profiles

You can also create multiple profiles for the same blog if you want to publish different articles under different user accounts.


For those concerned with security issues, I added the “Save username and password” check box. Uncheck it if you don’t want your login details to be saved when you close UseShots Editor. Keep it checked if you don’t want to enter username/password all the time.

4. Other blog platforms

Adding site profiles is also a step towards supporting multiple blog platforms. Soon you’ll be able to publish UseShots not only to WordPress blogs.

5. Testing and feedback

Some astute readers might have noticed that I published unofficial versions 0.2.3.35 and 0.2.3.36 on the Download page under the “development version” link. When I have a new version that still requires a testing, I’ll be publishing it under the “development version” link. Use this link at your own risk if you don’t want to wait until I release a stable version or want to help me with testing.


And although I consider v0.2.3.37 as a stable version, it’s still a beta and your comments and bug reports are welcome.

UseShots Editor is on the home page of ZDNet.nl

March 14th, 2008 Posted in UseShots Editor, UseShots Samples | 2 Comments » На русском

1. ZDNet.nl

ZDNet.nl

Yesterday, UseShots Editor had been published on BetaNews. Today I discovered that people come to my blog from ZDNet.nl and ZDNet.be (major Dutch and Belgian software portals in the CNet Networks).

I was intrigued and decided to find out what they had written about UseShots. I opened www.zdnet.nl, typed “useshots” in their search box and almost the hit the Enter button. At that moment I noticed that “Download Tip” area next to the search box.

2. Download Tip

Download Tip

The caption was “UseShots Editor 0.2.3.32 beta” and the thumbnail depictied a part of the UseShots Camera.

That was cool!
I expected to find some page with a short description and a download link buried deep in the ZDNet.nl site. It was a big surprise to find UseShots as a featured download at the top of the home page. Moreover, that Download Tip section was at the top of every ZDNet.nl’s page.

I understand it’s only for one day or, maybe, even one hour, but anyway thanks ZDNet!

3. The article.

The article.

I wish I knew Dutch. This is the first article about UseShots Editor since its release two weeks ago and I can hardly understand a couple of words (like UseShots and Wordpress ;-)).

It’s a three paragraphs long article with two screen shots written by Pieterjan Van Leemputten. I didn’t take a screen shot of the whole article to avoid copyright infringement (I hope this header can be considered as fair use).

It is very encouraging to see that people download the early beta of my new software and find it worthwhile to write an article about it and even make it a featured download on such a well known site. Thank you Pieterjan!

Meanwhile, I’m working on new features and expect to have an update next week. Please, don’t forget about feedback.

Google, any idea already?

March 5th, 2008 Posted in UseShots Samples | No Comments »

I constantly use Google as a translation tool when writing something in English. If I’m not sure I’m using some word or phrase correcly, I type it in quotes in the Google toolbar and check the search results, which usually help me identify the most appropriate usage.

Unmatching result estimates and pagination

Unmatching result estimates and pagination
This time I checked the “any idea already” word combination and was very surprised with the results page (larger picture)

2,700 results. 10 results per page. How many pages?

2,700 results. 10 results per page. How many pages?
Google’s estimates on total results count have never been very accurate and they never show more than 1,000 results for any search, but you don’t usually question their trustworthiness.

4 pages. Surprise!

4 pages. Surprise!
How come they have only 4 pages for 2,700 results?

Page #3 is the last page

Page #3 is the last page
And it looks like the page number estimate is more accurate than the one at the top of the page. I can browse no further than page #3.

It looks like Google has reached the size of Microsoft, and have different teams working on different parts of the search result pages. They should definitely have the “top-of-the-SERP-estimates team” use the same database as the “pagination team”. ;-)

I still don’t know if I can use the word combination. Google, any idea already? ;-)

P.S. This is a sample article created using UseShots Editor

Update: Now you can save articles as drafts.

March 5th, 2008 Posted in Updates, UseShots Editor | No Comments » На русском

Thanks to all who decided to give UseShots Editor a try. It’s only 5 days since the initial release and a brief announcement in Weblog Tools Collection forum, but I see people visiting this site, downloading the program, leaving their comments, sending me their bug reports (nothing serious, fixed in the new version.)

And here it is – the first update! (I am not Microsoft. I don’t need to spend months to approve and test every single feature.)

UseShots Editor v0.2.3.32 is available for downloading.

What’s new?

  • One bug fixed: Sometimes, the previous version of the program failed to publish the last screen shots of an article.
  • One feature added: You can save articles as drafts in your WordPress blog.

Screen shot: saving article as a draft

Why saving articles as drafts was the first feature I added?

  1. This was the first feature request in my blog’s comments.
  2. In the previous version, every published article was immediately available to all site visitors and feed readers, which made it not very suitable for testing on live blogs. We all want to play with new tools for some time before we start using them in “production”, but not all have a test blog where they can publish articles before they are confident enough with UseShots Editor. Now it is safe to test UseShots even on live blogs. Just save your article as a draft; log in to the blog’s admin area and open the saved draft in the edit mode (UseShots will provide you with a direct link to edit the draft). You will see the draft of an article created with UseShots Editor. You can verify its accuracy or review the HTML code to ensure it doesn’t contain any malicious code or hidden links. And finally, publish the article if you are satisfied with it. Take your time to play with drafts before you start publishing right from UseShots Editor.
  3. Saving articles as drafts, you can overcome limitation of the current version of UseShots Editor: lack of WordPress categories support and lack of WYSIWYG editor. Categories, WYSIWYG editor along with a spell checker and all the other standard blogging features are available when you open saved drafts in the WordPress admin area.
  4. As you might know, not all WordPress users can publish post. There is a WordPress user role called “contributor”. Contributors can edit their post but cannot publish. Now, with the “save as draft” feature, even contributors can use UseShots Editor.

Sometimes one little check box can make a big difference.

Do you still have any excuses not to try UseShots Editor? It’s free, doesn’t require any third-party tools. No need to configure anything on your web server and in your blog. It just works. And now, with the “save as draft” feature, there is no risk to corrupt anything in your live blog. Download and use it.

And don’t forget to share your thoughts with me. As you can see, I listen to your feedback and quickly react by releasing updates.

Screen Shots for Blogs (Meet the UseShots).

February 29th, 2008 Posted in UseShots Editor | 6 Comments » На русском

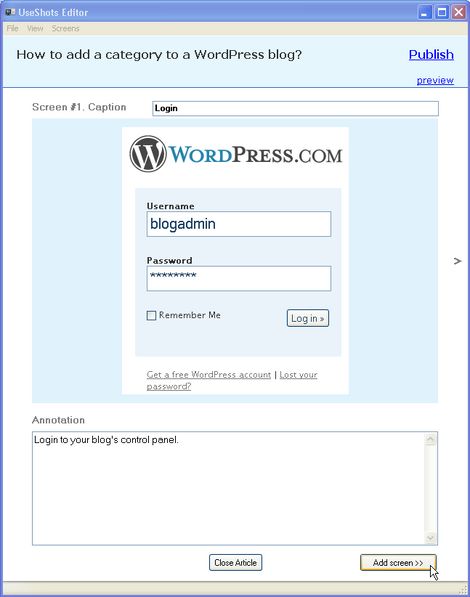
Finally, I’ve reached a stage where I can unveil my new program, I’ve been working on in my spare time for the last several months. UseShots Editor is a free specialized software program for bloggers, that need to take various screen shots and insert them in their articles frequently. (download here).

I called the program UseShots. I define this word as Useful Screen Shots. UseShots are series of annotated screen shots that show how to use the stuff they depict (which makes them useful).

The problem
It was originally created to solve my own problem. I wanted to create a series of illustrated blog post for another software project I participated in. The articles would describe how users could solve their tasks using our program. I started taking screenshots and very soon I realized that I had to deal with multiple little annoying problems.

My typical sequence of steps was as follows: Print Screen. Insert the screen into a graphics editor. Crop the area I need. Then I need to compare the width of the picture with the width of my blog column. If the picture is wider, I need to either resize the image or adjust the window size and take a new screen shot.

Resizing screen shots
Both variant are not perfect. In most cases shrinking images to 50% or 25% of their original size will get you the best possible quality. The picture looks good, but sometime small details become unreadable. Other shrinkage ratios may get you a blurry picture. If the resized image quality is not acceptable, I try to adjust the size of the window I’m taking a screen shot of, so that the picture fits the blog’s column straight away or the shrunken image preserves small details readable. Since I couldn’t tell the size of a screen area before I crop it in a graphics editor, sometimes I had to repeat these steps several times to get a screen shot of acceptable quality and size. How I wished I had some kind of ruler on the screen, so that I knew the size of every single area before I capture it.

Image formats
To save a screen shot on disk I needed to choose the image format. GIF or JPEG? The main criterion was the file size along with good quality. (I hate to download unreasonably heavy screen shots, which file size could be several times as little if they were saved in a more suitable image format. And if you have a limited disk space on your server or pay for bandwidth overage, you would also want to keep your files as small as possible.) In most cases, GIF works better for texts and solid colored interface elements with sharp borders between colors, while JPEG is more suitable for elements with smooth transitions between colors (photographs, shrinked, slightly blurry screen shots, elaborate gradients). However in more complex cases when my screen shots combined elements of both types, I need to save files in both formats, preview them, and compare there size before I could choose the winner.

Uploading screen shots
I wrote my blog posts in a web-based editor in the admin area of my blog. To insert a picture, I needed to specify a link to the image file on the web. So I had to upload the files in the first place. It’s usually not a problem, but you need to:

  1. Remember the file names and where you saved them to (sometimes it’s not an easy task, especially when you created the screen shots a week ago and you have many draft copies similarly named and saved in the same place.)
  2. Match the links to the uploaded images with specific pictures, to insert them in proper places of a post (How many time I was told to give files meaningful names! ;-).
  3. Manually insert each link (there can be dozens of them).

And when all image files are uploaded and inserted into the draft, you start to realize that one of the screen shots poorly illustrates your point and needs to be replaced with a new one. Or notice that another screen shot contains your private email. Damn! Gotta start all over again (capture, adjustments, formats, uploads), luckily it’s only one screen shot this time.

I managed to complete one article after all, but totally lost any desire to go on with the rest articles in the same manner. Just too much time and efforts for this secondary task.

Looking for third-party tools
Nonetheless I still liked the idea of illustrated tutorials in our blog. I started to play with various offline blog post editors and screen capture utilities, but couldn’t find anything that would make my task simple enough. The editors could only insert already existing images (local and online). The screen capture programs could only create individual image files. Not much help, really. To create and publish an article, I still have to use at least 2-3 different programs, not all of which are free. There’s a great deal of unnecessary hassle of switching between the programs. And the “file problems” (choosing image formats, file names, remembering where you saved files, locating and inserting the files one by one) are still there. I wish I there was just one program that could do all the stuff!

The idea
“Hey, that’s an idea! I need a specialized program!” occurred to me. “And I should be able to develop it by myself.”

I compiled a list of requirements for my new program. It should be a single program that integrates all functionality I need. It should:

  • Capture screen shots and add textual annotations to them.
  • Automatically adjust wide screen shots to my blog’s column width, preserving good quality of the images.
  • Help me see the dimensions of any area of the screen before I capture it, so that I know whether it will fit the blog’s column width without resizing or not.
  • Group annotated screen shots into articles and publish the articles in my blog.
  • Save drafts of my articles, so that I can work on them at my own pace.
  • Do all the “file stuff” behind the scenes (formats, locations, uploads, links).

This is how the UseShots Editor was born.

When I started to test my first, very limited, development versions, I was amazed at how much easier it was to create and publish screen shot based articles using the new program. It wasn’t a tedious, time-consuming activity anymore.

UseShots & digital cameras
It was like buying a new digital photo camera, after using an old film camera. Do you remember film cameras? After you have taken a picture you have no idea how good the result will be until you complete the whole film, develop it and make prints, which may happen days or weeks later. And having returned from vacation, you may discover that the film was defective and all your shots are irrevocably lost. Digital cameras have made our lives easier. No more need to change films. No more need to wait until you can see your photos. Everything is available immediately. What you see on the screen will be on your photos. Just frame the picture and shoot. Then view the results. If you don’t like a photo, you can delete it and take another picture while you are still there. It’s not a coincidence that a screen capture tool in UseShots employs the same principle as a digital photo camera (frame the picture in its viewfinder and shoot.)

UseShots for all
The more I worked on UseShots the more I felt this program may come in handy for other bloggers. After all, it’s a common practice to insert screen shots in to blog posts (especially computer-related.) Software developers could post illustrated tutorials for their programs and web services. In an enterprise environment, they could post illustrated instructions for new employees on their Intranet blogs to help them get started in a more efficient manner. It may happen that some people want to post screen shot based articles but gave up the idea as involving too much trouble.

That’s why I decided to set up this web site and make UseShots available as a free download.

Although the program is in its early stages and there is a lot of ideas waiting for implementation, but the basic functionality is ready and you can use it to create screen shot based articles and publish them on your blogs. This program has been tested on my friends’ computers (thanks to them) and proved to be pretty stable.

WordPress
The current version (0.2) works only with WordPress‘ blogs. I chose this blog platform because of its popularity (millions of blogs), high level of extensibility through its plugin system, robust API that allows to upload files (Initially, I thought about Blogger, but their API lacked the file upload functions). WordPress is offered as a one-click installation on many hostings plans, and there is free WordPress hosting at WordPress.com with a lot of disk space for file uploads (3Gb).

Some limitations of the current version:

  • Windows only. (2000, XP, may be Vista). This limitation doesn’t apply to your blog.
  • WordPress blogs only. Tested on versions 2.3+ (There are plans to support other blog platforms)
  • WordPress’ categories are not supported. Your articles will be published in the default category. Tags are supported. You can use tags as an alternative to categories. (It is planned to support categories.)
  • No WYSIWYG editor. However, you can use some HTML (b, i, u, a, span, div) in the plain text editor.
  • No spell checker (planned).

The most recent version of UseShots Editor can be downloaded here. I will be updating it as I add new features and fix bugs, so you might want to bookmark this site or subscribe to the RSS feed

I’d like to see how you use my program. Please consider sending me links to your blog posts created with UseShots Editor. I’ll be posting them here as examples of what kind of stuff one can create with UseShots.

Tutorial
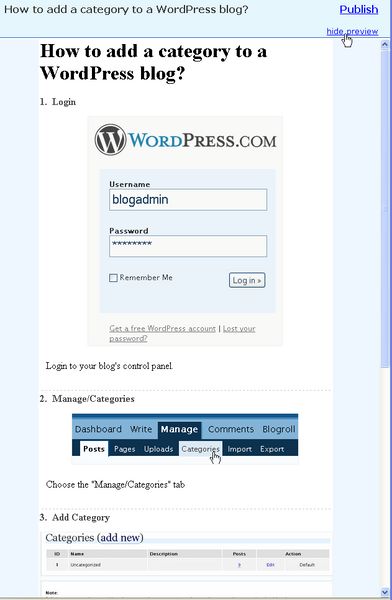
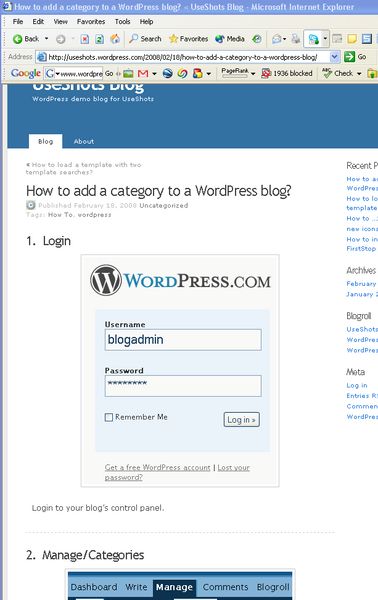
And the first link will be to my own article: Getting Started with UseShots Editor. It’s an illustrated step-by-step tutorial, created and published using exclusively UseShots Editor.

Feedback
Should I mention that any feedback is welcome? Please, leave your comments here or use this form to contact me directly.

Getting Started with UseShots Editor.

February 22nd, 2008 Posted in Tutorials, UseShots Editor, UseShots Samples | 6 Comments » На русском

1. Introduction

This tutorial shows how to create your first screen shot based article and publish it on a WordPress blog in less than 5 minutes.

Requirements:
1. You need an active WordPress blog, where you have permission to post articles. If you don’t have one, you can sign up for a free WordPress.com hosted blog (btw, they provide 3Gb of space for uploads now.)
2. You need to download and install UseShots Editor (only Windows version at this moment).

BTW, this whole tutorial has been created and published using UseShots Editor.

2. Let’s start

Let's start
Launch UseShots Editor and click the Start new article link.

3. New Article

New Article
To create a new artcle, all you need to do is give it a descriptive title (it will be used as a title of your blog post)

If this is the first time you use UseShots Editor, you don’t have any site profiles yet, so just leave the “Undefined” profile for now. We’ll have a chance to configure the site profile later.

Note that in the “undefined” site profile, a maximum width of screen shots is 480 pixels, which means that larger images will be automatically resized to fit the blog’s column width ( 480 pixels is the width that fits many WordPress themes).

You might want to create a site profile straight away if your blog’s column width is narrower than 480 pixels and you don’t want larger screen shots to break your site layout. Or if the column width is significantly wider and you want screen shots that are wider than 480 pixels but still fit the column’s width to be saved without resizing to preserve the best quality of screen shots.

To create a new site profile, click the “Add New” button. Creating site profiles is covered in the step 10 of this tutorial.

4. The First Screen

The First Screen
In UseShots Editor, you write your articles screen after screen.

Each screen consists of
1. Caption - a short description of the screen. It will be displayed as a sub header in your blog.
2. Screen shot - the picture itself
3. Annotation - a textual description of the screen. Write your instructions, reviews, anything else here - you are the author.

The first thing you might want to do is take a screen shot. Just click the Take screen shot button in the center of the screen.

5. UseShots Camera

UseShots Camera
You will see the UseShots camera - a window with a transparent area inside the red frame.

It works the same way as your digital camera. You can click-and-drag it all over your screen and everything inside the red frame will be captured when you hit [Enter] on your keyboard or press the “Shoot” button.

You can resize the camera window as any other window - just click-and-drag its boarders and corners. This way you can capture an arbitrary area of the screen.

And you don’t have to worry about the size of the screen shot. It will be automatically resized to fit your blog’s layout.

At the upper left corner of the camera window, you will see the dimensions (width x height) of the captured area.

6. Completing Screen Information

Completing Screen Information
Once the screen shot is taken it will appear in the center of the UseShots Editor.

Give it a descriptive caption. (These captions will also be used as alt parameters of img tags when the article is published. )

Add a textual description of the screen in the Annotation edit box.

Although it is recommended that you enter captions and annotations, they are optional. Even screen shots are optional.

To add a new screen to your article click the Add Screen >> button at the lower right corner of the editor.

7. Preview Link

Preview Link
Anytime you want to preview the whole article (not just one screen at a time), click the preview link at the upper right corner of the editor.

8. Preview

Preview
In the preview mode, you will see how your article will look on a web page.

Note: the actual look of the published article will depend on your blog’s theme settings.

To close the preview mode, click the hide preview link at the upper right corner.

9. Ready to Publish

Ready to Publish
When you are ready to publish your article, click the Publish link at ther upper right corner.

10. Site Profile

Site Profile
If you are publishing an article for the first time, you’ll need to enter some information about your blog, so that UseShots Editor could publish your articles.

Site Type - only WordPress blog at this point.
Profile Title - title that will help you identify the profile among other available profiles.
Home Page - your blog’s homepage (e.g. http://myblog.wordpress.com)
Max Width - maximum width of screen shots that will fit your blog’s column without resizing. Wider screen shots will be automatically resized.
XML-RPC end point - you can leave this field blank (recommended) unless your blog has a non-standard endpoint.

You can leave out the login details at this point, you will be promted for username/password when you publish the article.

If the “Save username and password” option is checked, the login details will be saved, and you won’t need to specify username/password next time you open UseShots Editor.

11. Title and Tags

Title and Tags
Before you publish the article, verify that the title is correct and you are posting the artcle under the correct account.

Add some descriptive tags to your article. Separate tags with commas.

If you check the draft option, the article will not appear on your site. It will be saved as a draft. You will need to specificaly publish it in the admin area of your blog.

Click Post >> when ready.

12. Article Published

Article Published
Once the article is published you can click the links to open it in a web browser. You can also copy the URL of the published article to clipboard.

Note: UseShots Editor provides you with WordPress default URLs that should work for any blog regardless of permalink style. You can get the real URL in the browser’s address bar when you open the link in a web browser.

13. Checking the Published Article in a Web Browser

Checking the Published Article in a Web Browser
Here is the fresh new, just-published article in a web browser.
The whole process took less than 5 minutes.

You are ready to create and publish your own screen shot based articles - UseShots.

14. Feedback

UseShots Editor is in its very early stages and I need your feedback to make it really useful for many bloggers.

Please let me know what you think about UseShots Editor. Leave your comments here or use this form to contact me directly.

And I’d like to see your articles created with UseShots Editor - send me the links.

Thanks!

Download UseShots Editor