
UseShots Editor v0.4 released
April 8th, 2008 Posted in Updates, UseShots Editor, UseShots Samples На русском1. UseShots Editor v0.4 has been released
In version 0.4 you will find more screen shot related fatures.
2. Screen capture timer
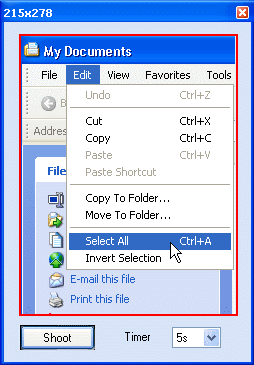
The timer is used to capture interface elements that must be active when you take a screen shot. For example, expanded menus and tooltips.
The timer has 3 modes:
- Off (default) - timer is inactive. The UseShots Camera captures the screen area inside the red frame the same moment you press “Shoot”.
- 5s - Timer is active. The screen shots is taken 5 seconds after you press “Shoot”.
- 10s - Timer is active. The screen shots is taken 10 seconds after you press “Shoot”.
3. How to use the screen capture timer?
- Position the UseShots Camera so that the desired area of the screen is inside the red frame.
- Make sure the element that you want to capture (expanded menu, tooltip, etc.) is also inside the frame.
- Select the delay time (either 5s or 10s). Make sure this time is enough to activate the desired element.
- Press “Shoot”. You wil see a countdown next to the “Shoot” button.
- Activate the element.When the countdown is over the screen shot will be taken and inserted into the current screen of the UseShots Editor.
Hint: I can use your mouse inside the red frame of the UseShots Camera as if this area was a hole.
4. Paste Images
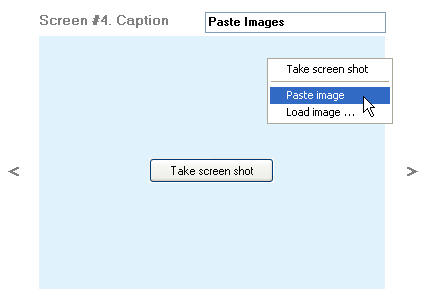
With this feature, you can insert a screen shots:
- of the entire desktop - Press Print Screen to place a bitmap of the desktop into clipboard.
- of the active Window - Press ALT + Print Screen to place a bitmap of the active into clipboard.
You can use this ALT + Print Screen trick to take a screen shots of the UseShots Editor window, which hides when you take screen shots using UseShots camera.
5. Load images
At this point, you can load BMP, JPG and GIF files.
6. Other new features
- Improved quality of GIF screen shots.
- em and strong tag added to the list of the HTML tags you can use in your UseShots atricles. Other tags are a, b, i, u, div, span.
- User Agent - you can identify UseShots Editor in you web server logs by the “UseShots Editor <version>” user agent string. Previous versions used a generic user agent string.
7. Release notes
You can download the latest version here.
Version 0.4 is compatible with previous versions 0.2.x.x and you can install it on top of the existing copy.
Here is the updated Getting Started with UseShots Editor tutorial.
Any comments and suggestions are welcome.
Did you enjoy this post? Why not leave a comment below and continue the conversation, or subscribe to my feed and get articles like this delivered automatically to your feed reader.


One Response to “UseShots Editor v0.4 released”
By iСофт on 2008-12-05
Спасибо, обязательно опубликуб программу у себя на сайте