June 10th, 2008 Posted in UseShots Editor, UseShots Samples | No Comments » На русском
New version
UseShots Editor 0.6 has been released.
The major new features is Article Layouts. Now you have more control over how your articles will look like. (Check the "Article Layouts" section below)
Download UseShots Editor 0.6
Smarter UseShots Camera

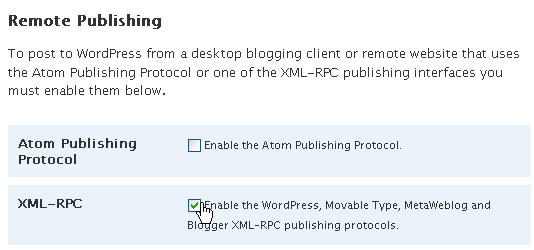
Among other improvements, smarter UseShots Camera that will warn you when you try to capture screen area that is wider than your blog’s column. You will know whether the screen shot will be automatically resized to fit the blog layout or it will retain its original size along with the best image quality.
<code> and <pre> tags
If you post code snippets on your blog, you will like the fact that you can now use code and pre tags.
code - defines computer code text.
pre - defines preformatted text. It helps preserve indentation (leading spaces and line breaks) in code snippets. The text renders in a fixed-pitch font
Here is how PHP code from the WordPress’ wp-atom.php file looks like when enclosed in pre tags
<?php
if (empty($wp)) {
	require_once('./wp-config.php');
	wp('feed=atom');
}

require (ABSPATH . WPINC . '/feed-atom.php');
?>
It is possible to achieve a much richer effect using style sheets.
Article Layouts

Before version 0.6 you couldn’t change the layout of UseShots-generated blog posts. The pre-built layout was good (centered images followed by annotations), but if you prefer to place images on the right or left side of the column and have text wrapping around the images, the only thing you could do is modify HTML code of the published articles in the WordPress admin panels.
Now when you create a new article or preview an existing one, you can easily select the layout that better fits your blog style.
There are three article layouts available: Tutorial, Article (left image), Article (right images)
Layout: Tutorial

By default, the Tutorial layout is used.
Every picture is on its own line, in the center of the column. Each screen is visually separated from other screens with dashed horizontal lines.
This layout is ideal for tutorials where you explain things step-by-step.
Layout: Article (left images)
")
If you write a review and prefer a more natural flow of text, you should consider one of the Article layouts.
In the Article (left images) layout, small images (less than a half column width) are placed on the left side of the column. Larger images are centered as in the Tutorial layout. Annotations wrap around the images. Screens are not visually separated.
Layout: Article (right images)
")
In the Article (right images) layout, small images (less than a half column width) are placed on the right side of the column. Larger images are centered as in the Tutorial layout. Annotations wrap around the images. Screens are not visually separated.
In this post (I created it in UseShots Editor) I used the Article (right images) layout.
Feedback
To date, there had been more than 1,000 downloads of my program. Whatever you are using it for, I hope UseShots Editor makes your life a little easier. :-)
And since the program is still under development, please suggest features you want to see in UseShots Editor. Let me know which blogging platforms you want it to work with.
Send me links to your blog posted created with UseShots Editor. I will be posting such links on my blog from time to time.
Your feedback is always welcome. Leave your comments here or use the contact form.
Tags: code, layout, update, UseShots Camera